

An Explanation to my "Personality Assessment" Application

On my free time, I like to learn more about hardware, software and different technologies. I publish articles about my recent learnings or the projects I have done.
Overview
This article explains how I created my "Personality Assessment" application. This application asks the user 10 questions and after answering all 10 questions, the application decides whether the user's current emotion is either sad, angry, elated or neutral. If someone is interested in making an app that requires survey questions, this application is similar to that of a form of questions made to take responses.
Materials
Back-end programming language and framework
- Python and Flask were used in this demonstration
Front-end programming languages:
HTML
CSS
Javascript
IDE
- Visual Studio Code was used in this demonstration
Planning
Before first coding, the application, the blueprints for creating the app were that both a back-end and front-end programming language are needed. This is because the back-end language can have a document to store the questions that are asked and can be imported to the front-end side to display to the users who are using the application. The front-end languages are also responsible for containing the HTML files for the homepage, to start the assessment and a page for each emotion result.
Procedure
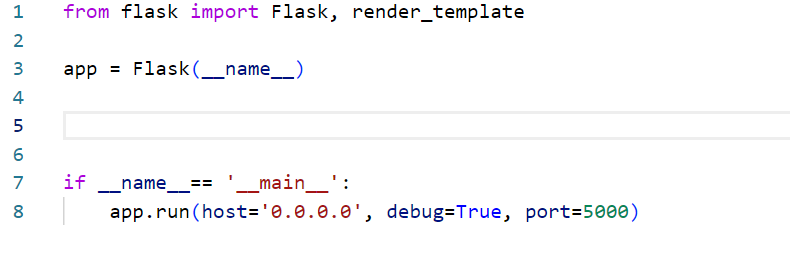
Step 1: Set up the Python File to run Flask
The basic structure of starting up a Flask application is shown down below
from flask import Flask, render_template

app = Flask(__name__)


if __name__== '__main__':
    app.run(host='0.0.0.0', debug=True, port=5000)
The lines written above mean:
from flask import Flask, render_template imports the modules Flask to use Flask framework and render_template for Flask to read HTML files in the directory.
app = Flask(__name__) makes the Flask instance. Within the parenthesis is the name of the module, by default in many documentations it is named name. Specifying this module is important as webpages are eventually added to the application, the module is responsible for routing webpages to other webpages correctly.
if __name__ = '__main__': app.run(host='0.0.0.0', debug=True, port=5000) the module name is being referenced as main to run the application locally
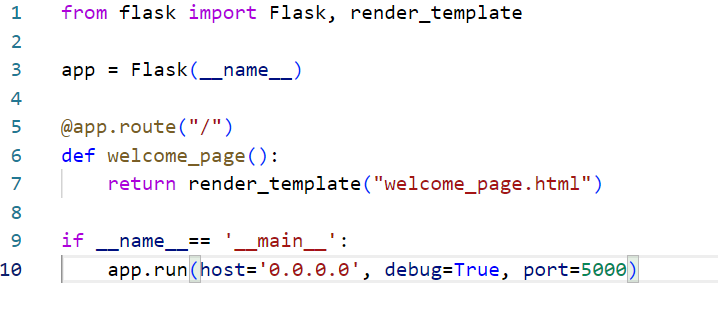
Step 2: Make Flask run the Homepage HTML file
After setting up the basics of the Flask file, now many routes can be created to connect and open web pages or HTML files. The HTML file needs to be created beforehand.
from flask import Flask, render_template

app = Flask(__name__)

@app.route("/")
def welcome_page():
    return render_template("welcome_page.html")

if __name__== '__main__':
    app.run(host='0.0.0.0', debug=True, port=5000)
As shown above, an HTML file named "welcome_page.html" will be referenced first upon starting up this application. When starting the application, the startup URL will be localhost:5000. This is because the application is being run locally on a machine and the default port to run Flask is 5000, both of these statements are also specified in the line app.run(host='0.0.0.0', debug=True, port=5000). localhost or 0.0.0.0 is equivalent to one another.

Does Flask require a way to structure your files for them to be read? Yes. Every Flask directory should follow a structure as shown below:
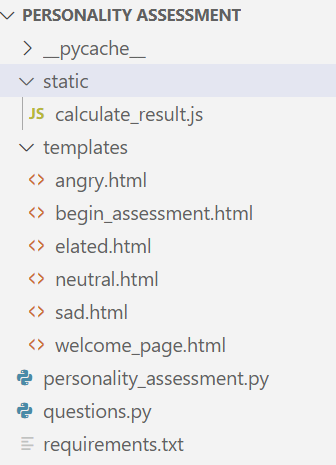
The picture above shows a directory named "Personality Assessment". Within the "Personality Assessment", must have a folder named "templates" to store all HTML files and another folder that must have the name "static" to store all Javascript files. The "Personality Assessment directory, contains the Python files and the requirements.txt. The requirements.txt shows what packages are needed to run this application on any computer or machine.
Step 3: Make the HTML Homepage Work
The homepage or welcome_page.html file is designed to welcome the user and click a button to lead them to another HTML page to start the Personality Assessment. Below is the "welcome_page.html" file:
<html>
    <head>
        <meta charset="utf-8">
        <title>
            Personality Assessment
        </title>

        <style>

            html {
                background-color: greenyellow;
            }

            h1 {
                font-family: math;
                font-size: 84px;
                border-top-style: solid;
                border-top-color: darkseagreen;
                border-bottom-style: solid;
                border-bottom-color: darkseagreen;
                background-color: white;
                border-left-style: solid;
                border-left-color: darkseagreen;
                border-right-style: solid;
                border-right-color: darkseagreen;
                color: green;

            }

            h2 {
                font-family: math;
                font-size: 36px;
                border-top-style: solid;
                border-top-color: darkseagreen;
                border-bottom-style: solid;
                border-bottom-color: darkseagreen;
                background-color: white;
                border-left-style: solid;
                border-left-color: darkseagreen;
                border-right-style: solid;
                border-right-color: darkseagreen;
                color: green;
                margin: auto;
                width: 65%;
                border: 3px solid darkseagreen;
                padding: 10px;

            }

            button {
                font-family: math;
                font-size: 32px;
                border-top-style: solid;
                border-top-color: darkseagreen;
                border-bottom-style: solid;
                border-bottom-color: darkseagreen;
                background-color: white;
                border-left-style: solid;
                border-left-color: darkseagreen;
                border-right-style: solid;
                border-right-color: darkseagreen;
                color: green;
            }

        </style>

    </head>

    <br>
    <br>
    <br>
    <center><h1> Welcome to the Personality Assessment! </h1> </center>


    <center><h2>
        This is a 10 question assessment to depict your current emotion.  <br>
        Click down below to start the assessment.
    </h2> </center>


    <br>
    <br>

    <center> <button onclick="window.location.href='assessment';">Start Assessment</button> </center>

</html>
The "welcome_page.html" HTML page shows this:
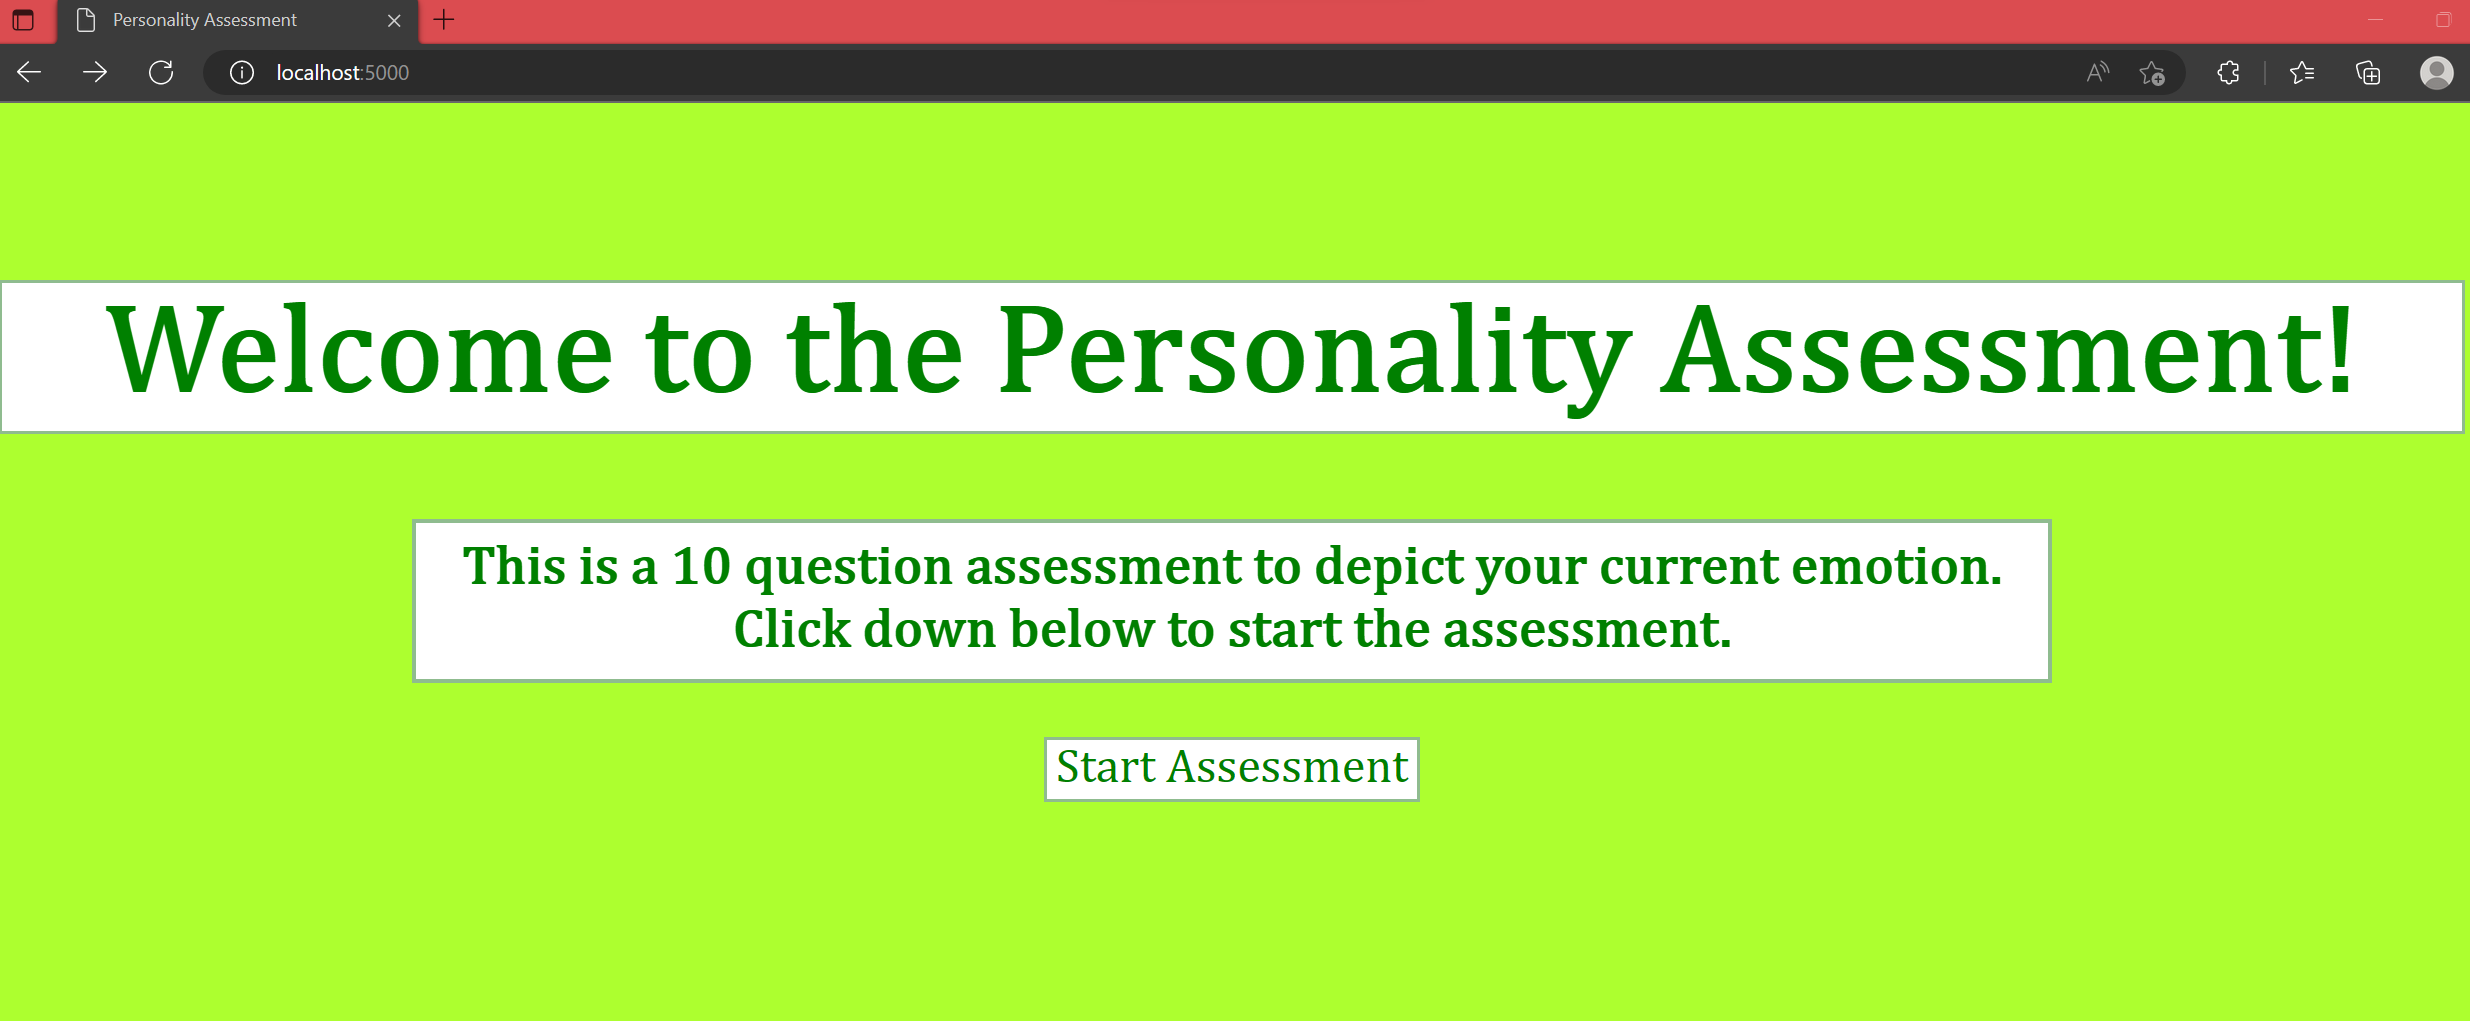
In HTML headers and buttons can be added with the tags <> and with written text. Header 1 contains "Welcome to the Personality Assessment!", and header 2 contains "This is a 10-question assessment to depict your current emotion. Click down below to start the assessment." The button contains "Start Assessment". The rest of the HTML file includes internal CSS to modify the appearance of the website's background, and headers, adding borders and the button. Clicking the button "Start Assessment" also includes the capability to lead to the HTML file that contains the assessment.
Step 4: Make the HTML Assessment Page
After clicking the button on the "welcome_page.html" it leads to a new HTML page or the assessment page. Two new files were created called "questions.py" and the "begin_assessment.html" file. The questions.py contains the questions that will be sent to and displayed on the "begin_assessment.html" page. This is done by importing the contents of "questions.py" to the "personality_assessment.py" file, where a new function and route are designed to finally send all the variables that contain the questions and answers to "begin_assessment.html". HTML reads Python variables by including the name of the python variable that was imported from the flask route and function in the format on the HTML page:
{{ name_of_python_variable }}
Below is the "questions.py" file:
# Personality Assessment Questions

def the_test():

    question1 = "Hello! I hope you had a good day!"
    q1_answer1 = "Yes"
    q1_answer2 = "No"
    q1_answer3 = "No, but thank you for asking"
    q1_answer4 = "N/A"

    question2 = "How many hours do you spend with your family or friends daily?"
    q2_answer1 = "3-5 hours"
    q2_answer2 = "0-2 hours"
    q2_answer3 = "5 or more hours"
    q2_answer4 = "0 hours"

    question3 = "How many people did you talk to today?"
    q3_answer1 = "0 people"
    q3_answer2 = "5 or more people"
    q3_answer3 = "1-4 people"
    q3_answer4 = "N/A"

    question4 = "Do you go outside?"
    q4_answer1 = "Yes"
    q4_answer2 = "No"
    q4_answer3 = "When I have to"
    q4_answer4 = "N/A"

    question5 = "If someone buys you food you didn't ask for and didn't like, does that bother you?"
    q5_answer1 = "Yes"
    q5_answer2 = "No"
    q5_answer3 = "No, but I'm thankful and I'll eat it"
    q5_answer4 = "N/A"

    question6 = "Do you have a substance use problem?"
    q6_answer1 = "Yes"
    q6_answer2 = "No"
    q6_answer3 = "I use substances, but I do not have a problem"
    q6_answer4 = "N/A"

    question7 = "Do you visit a doctor?"
    q7_answer1 = "Yes"
    q7_answer2 = "No"
    q7_answer3 = "I do not need help from a doctor"
    q7_answer4 = "N/A"

    question8 = "Does peer pressure get to you?"
    q8_answer1 = "Yes"
    q8_answer2 = "No"
    q8_answer3 = "I am not sure"
    q8_answer4 = "N/A"

    question9 = "Do you have a job?"
    q9_answer1 = "Yes"
    q9_answer2 = "No"
    q9_answer3 = "No, but I am currently applying"
    q9_answer4 = "No, I have no interest"

    question10 = "How many hobbies do you have?"
    q10_answer1 = "1-3 hobbies"
    q10_answer2 = "3 or more hobbies"
    q10_answer3 = "0-2 hobbies"
    q10_answer4 = "None at all"


    return question1, q1_answer1, q1_answer2, q1_answer3, q1_answer4, question2, q2_answer1, q2_answer2, q2_answer3, q2_answer4, question3, q3_answer1, q3_answer2, q3_answer3, q3_answer4, question4, q4_answer1, q4_answer2, q4_answer3, q4_answer4, question5, q5_answer1, q5_answer2, q5_answer3, q5_answer4, question6, q6_answer1, q6_answer2, q6_answer3, q6_answer4, question7, q7_answer1, q7_answer2, q7_answer3, q7_answer4, question8, q8_answer1, q8_answer2, q8_answer3, q8_answer4, question9, q9_answer1, q9_answer2, q9_answer3, q9_answer4, question10, q10_answer1, q10_answer2, q10_answer3, q10_answer4
The "questions.py" file has a variable assigned to every question and possible answers to choose from for each question. All this code is within a function named "the_test()", to return its values to the "personality_assessment.py" file. It is possible to include this code in the "personality_assessment.py" file, but the best practice is to divide the code into separate files to be organized. At the top of the "personality_assessment.py" file include the line "import questions" to first gather the data from the "questions.py" file.

from flask import Flask, render_template
import questions

# The word "questions" is being imported since that is the name of the file. Any python file can be imported to another python file as long you write its name correctly since it is case sensitive.
When a new route is made, all the variables must be written on the left side and set equal to the file and its function that contains the data. In this case, all the variables were declared in the "questions.py" file such as "question1, q1_answer1, ....." is set equal to questions.the_test().
@app.route("/assessment")
def start_assessment():
    question1, q1_answer1,.... = questions.the_test()
    return render_template("begin_assessment.html", question1=question1, q1_answer1=q1_answer1...... )
Reassigning the values such as question1=question1 is necessary since the python file knows the variable question1 exists but not the HTML file. By reassigning the value, the variable data can now be passed to the HTML file, in this case, "begin_assessment.html". To view the entire code for the function "def start_assessment():", please check the source code for "personality_assessment.py".
The "personality_assessment.py" was modified to incorporate and route these new files correctly since it runs the Flask framework.
Step 5: View and Take the Assessment Page
The source code for the "begin_assessment.html" page is shown below:
<!DOCTYPE html>
<!-- Begin Assessment -->
<html>

    <head>

        <style>
        html {
            background-color: greenyellow;
        }

        h1 {
            color: green;
            font-family: math;
            font-size: 48px;
        }

        h2 {
            color: green;
            font-family: math;
            font-size: 32px;
        }

        .questions {
            margin: auto;
            width: 60%;
            border: 3px solid darkseagreen;
            padding: 10px;
            background-color: white;
            font-family: math;
            font-size: 20px;
        }


        button {
                font-family: math;
                font-size: 32px;
                border-top-style: solid;
                border-top-color: darkseagreen;
                border-bottom-style: solid;
                border-bottom-color: darkseagreen;
                background-color: white;
                border-left-style: solid;
                border-left-color: darkseagreen;
                border-right-style: solid;
                border-right-color: darkseagreen;
                color: green;
            }

        </style>

    <head>

        <center> <h1> Personality Assessment </h1> </center>
        <center> <h2> Please read and answer all the questions honestly before submitting. Good luck!</h2> </center>

        <body class="questions">

                    1. {{question1}}<br>
                    <input type="radio" name="q1" id="1a"> {{q1_answer1}} <br>
                    <input type="radio" name="q1" id="1b"> {{q1_answer2}} <br>
                    <input type="radio" name="q1" id="1c"> {{q1_answer3}} <br>
                    <input type="radio" name="q1" id="1d"> {{q1_answer4}} <br>
                    <br>

                    2. {{question2}}<br>
                    <input type="radio" name="q2" id="2a"> {{q2_answer1}} <br>
                    <input type="radio" name="q2" id="2b"> {{q2_answer2}} <br>
                    <input type="radio" name="q2" id="2c"> {{q2_answer3}} <br>
                    <input type="radio" name="q2" id="2d"> {{q2_answer4}} <br>
                    <br>

                    3. {{question3}}<br>
                    <input type="radio" name="q3" id="3a"> {{q3_answer1}} <br>
                    <input type="radio" name="q3" id="3b"> {{q3_answer2}} <br>
                    <input type="radio" name="q3" id="3c"> {{q3_answer3}} <br>
                    <input type="radio" name="q3" id="3d"> {{q3_answer4}} <br>
                    <br>

                    4. {{question4}} <br>
                    <input type="radio" name="q4" id="4a"> {{q4_answer1}} <br>
                    <input type="radio" name="q4" id="4b"> {{q4_answer2}} <br>
                    <input type="radio" name="q4" id="4c"> {{q4_answer3}} <br>
                    <input type="radio" name="q4" id="4d"> {{q4_answer4}} <br>
                    <br>

                    5. {{question5}} <br>
                    <input type="radio" name="q5" id="5a"> {{q5_answer1}} <br>
                    <input type="radio" name="q5" id="5b"> {{q5_answer2}} <br>
                    <input type="radio" name="q5" id="5c"> {{q5_answer3}} <br>
                    <input type="radio" name="q5" id="5d"> {{q5_answer4}} <br>
                    <br>

                    6. {{question6}} <br>
                    <input type="radio" name="q6" id="6a"> {{q6_answer1}} <br>
                    <input type="radio" name="q6" id="6b"> {{q6_answer2}} <br>
                    <input type="radio" name="q6" id="6c"> {{q6_answer3}} <br>
                    <input type="radio" name="q6" id="6d"> {{q6_answer4}} <br>
                    <br>

                    7. {{question7}} <br>
                    <input type="radio" name="q7" id="7a"> {{q7_answer1}} <br>
                    <input type="radio" name="q7" id="7b"> {{q7_answer2}} <br>
                    <input type="radio" name="q7" id="7c"> {{q7_answer3}} <br>
                    <input type="radio" name="q7" id="7d"> {{q7_answer4}} <br>
                    <br>

                    8. {{question8}} <br>
                    <input type="radio" name="q8" id="8a"> {{q8_answer1}} <br>
                    <input type="radio" name="q8" id="8b"> {{q8_answer2}} <br>
                    <input type="radio" name="q8" id="8c"> {{q8_answer3}} <br>
                    <input type="radio" name="q8" id="8d"> {{q8_answer4}} <br>
                    <br>

                    9. {{question9}} <br>
                    <input type="radio" name="q9" id="9a"> {{q9_answer1}} <br>
                    <input type="radio" name="q9" id="9b"> {{q9_answer2}} <br>
                    <input type="radio" name="q9" id="9c"> {{q9_answer3}} <br>
                    <input type="radio" name="q9" id="9d"> {{q9_answer4}} <br>
                    <br>

                    10. {{question10}} <br>
                    <input type="radio" name="q10" id="10a"> {{q10_answer1}} <br>
                    <input type="radio" name="q10" id="10b"> {{q10_answer2}} <br>
                    <input type="radio" name="q10" id="10c"> {{q10_answer3}} <br>
                    <input type="radio" name="q10" id="10d"> {{q10_answer4}} <br>
                    <br>


                    <center> <button onclick="result()" class="button">Submit</button> </center>

                    <script type="text/javascript" src="{{ url_for('static', filename='calculate_result.js')}}"> </script>

                    </body>


        </body>

</html>
On the internet browser, it should appear as this:
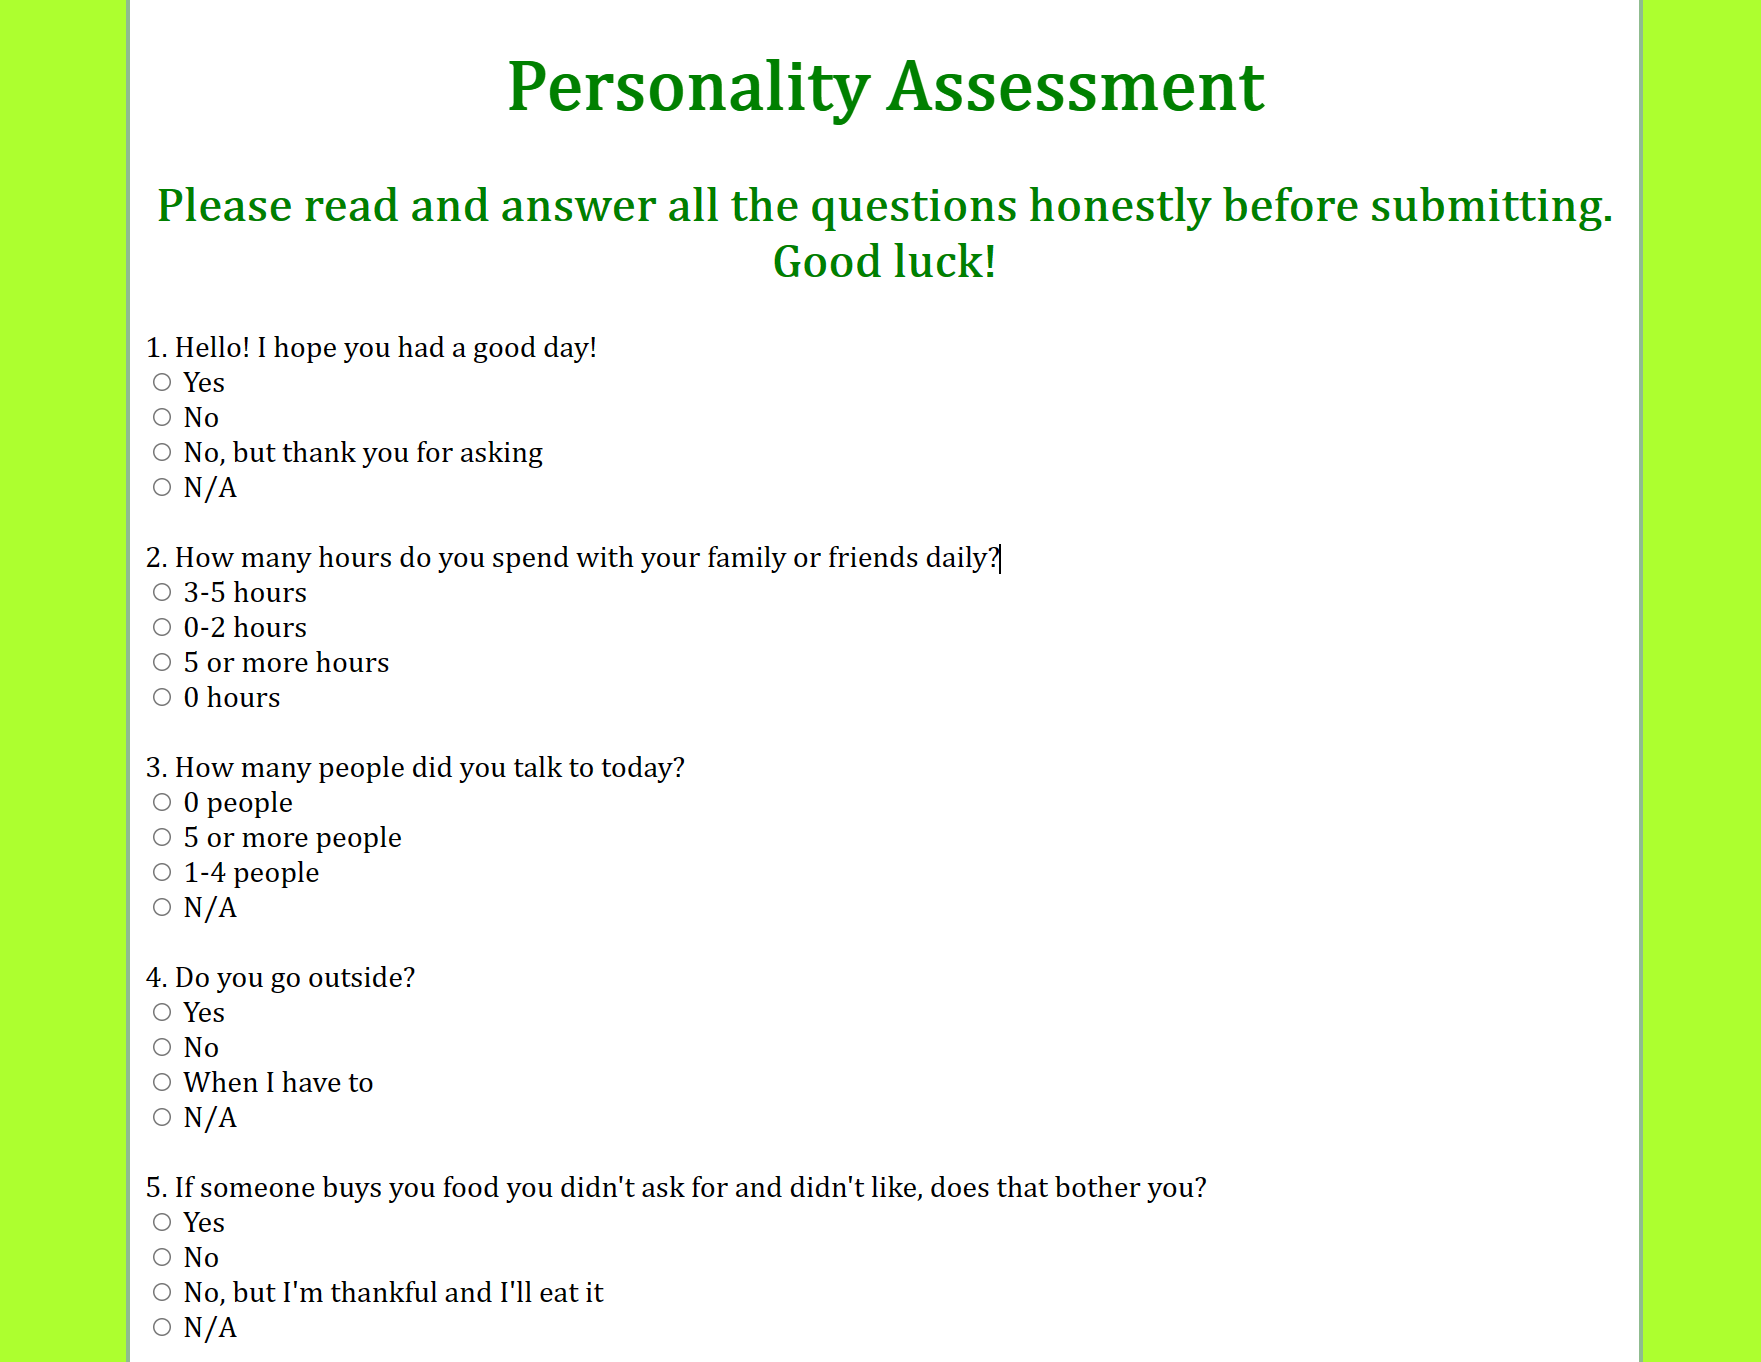

The first few lines of code are CSS code to design the defined HTML tags. Afterward, a few lines of HTML code are written to import the questions from the "questions.py" file. As stated before many variables are within double brackets or {{ }} because that is the syntax of how HTML retrieves Python data. The HTML questions are also assigned unique identifiers. By looking at question 1's options, each choice is either 1a, 1b, 1c, 1d, and question 2's options are 2a, 2b, 2c, 2d and this applies to every question. This is done to implement which choice is taken and tallies up your total score to output which emotion reflects your current mood. Depending on which choice is taken for any question, will increase either the sad, angry, elated or neutral counter and which counter is the highest, displays which emotion page at the end of the assessment. HTML does not support arithmetic operations, therefore, a javascript file called "calculate_result.js" handles the arithmetic operations and tallies up the scores after the assessment is finished. At the end of the HTML file, it is linked to the Javascript file as shown here:
<center> <button onclick="result()" class="button">Submit</button> </center>

                    <script type="text/javascript" src="{{ url_for('static', filename='calculate_result.js')}}"> </script>
The button on the assessment page is linked to a "result()" function. That function appears in the "calculate_result.js" file that tallies up the scores. The "script type="text/javascript" ..... " line shows Flask where to find the calculate_result file to make the button work.
Step 6: The Results
After answering every question to the assessment, the following pages will appear after finishing the assessment:
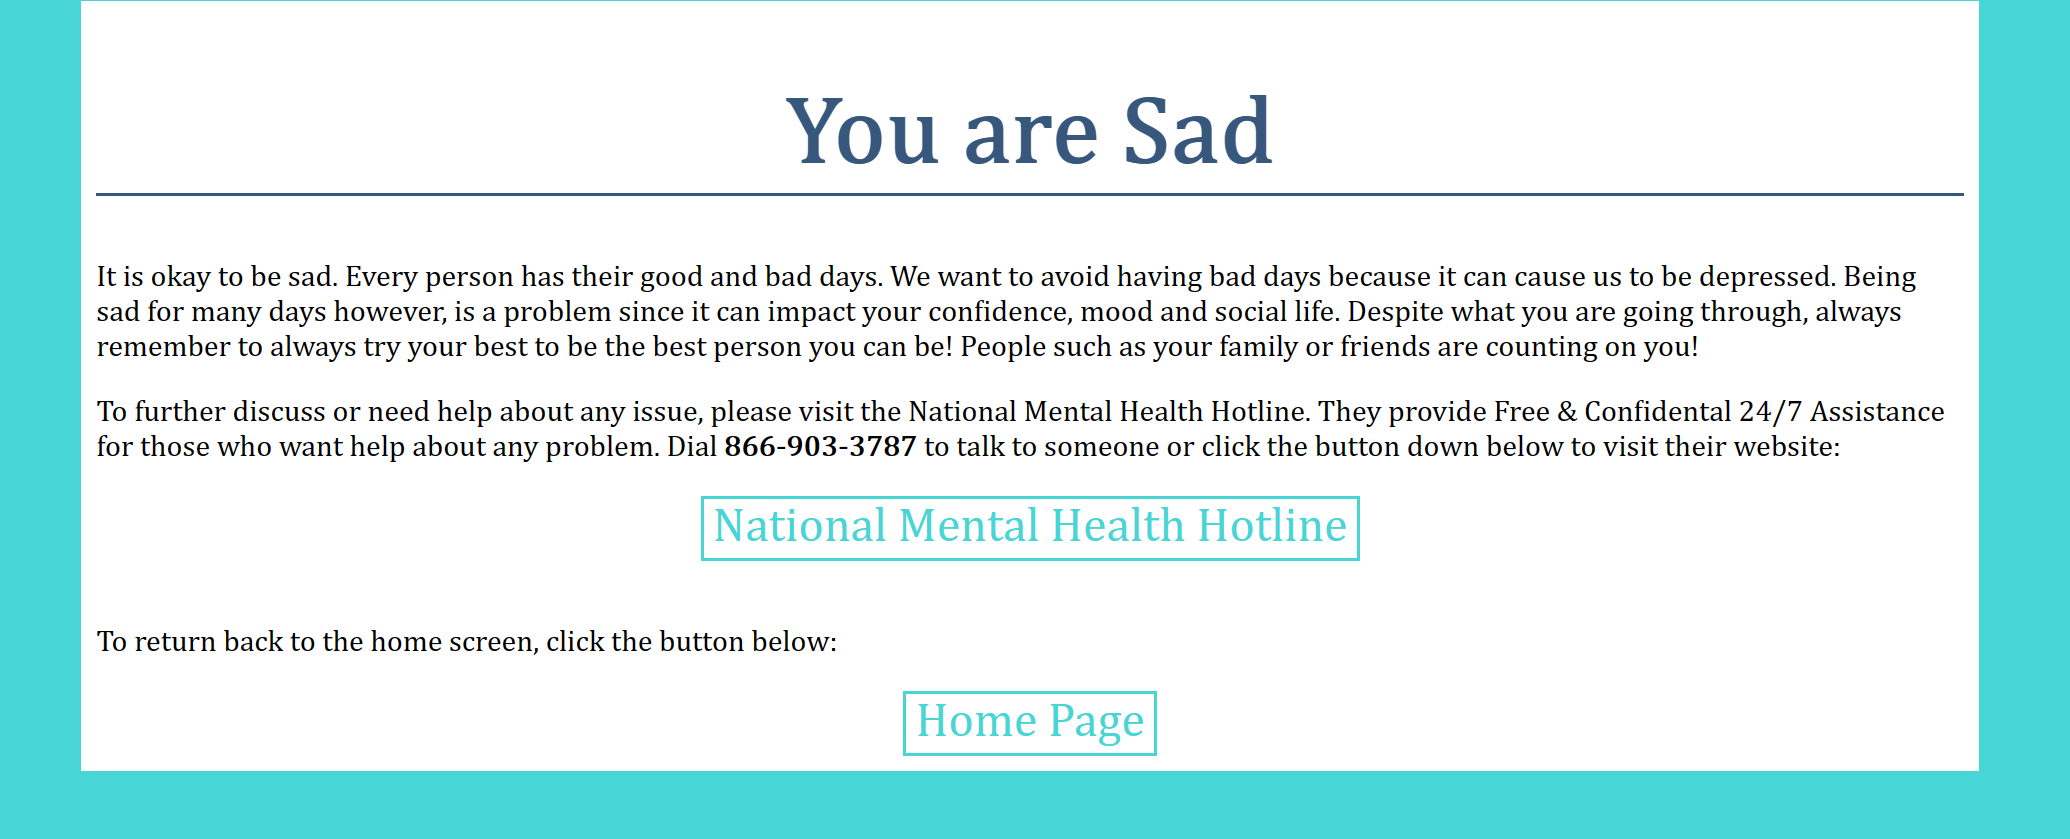
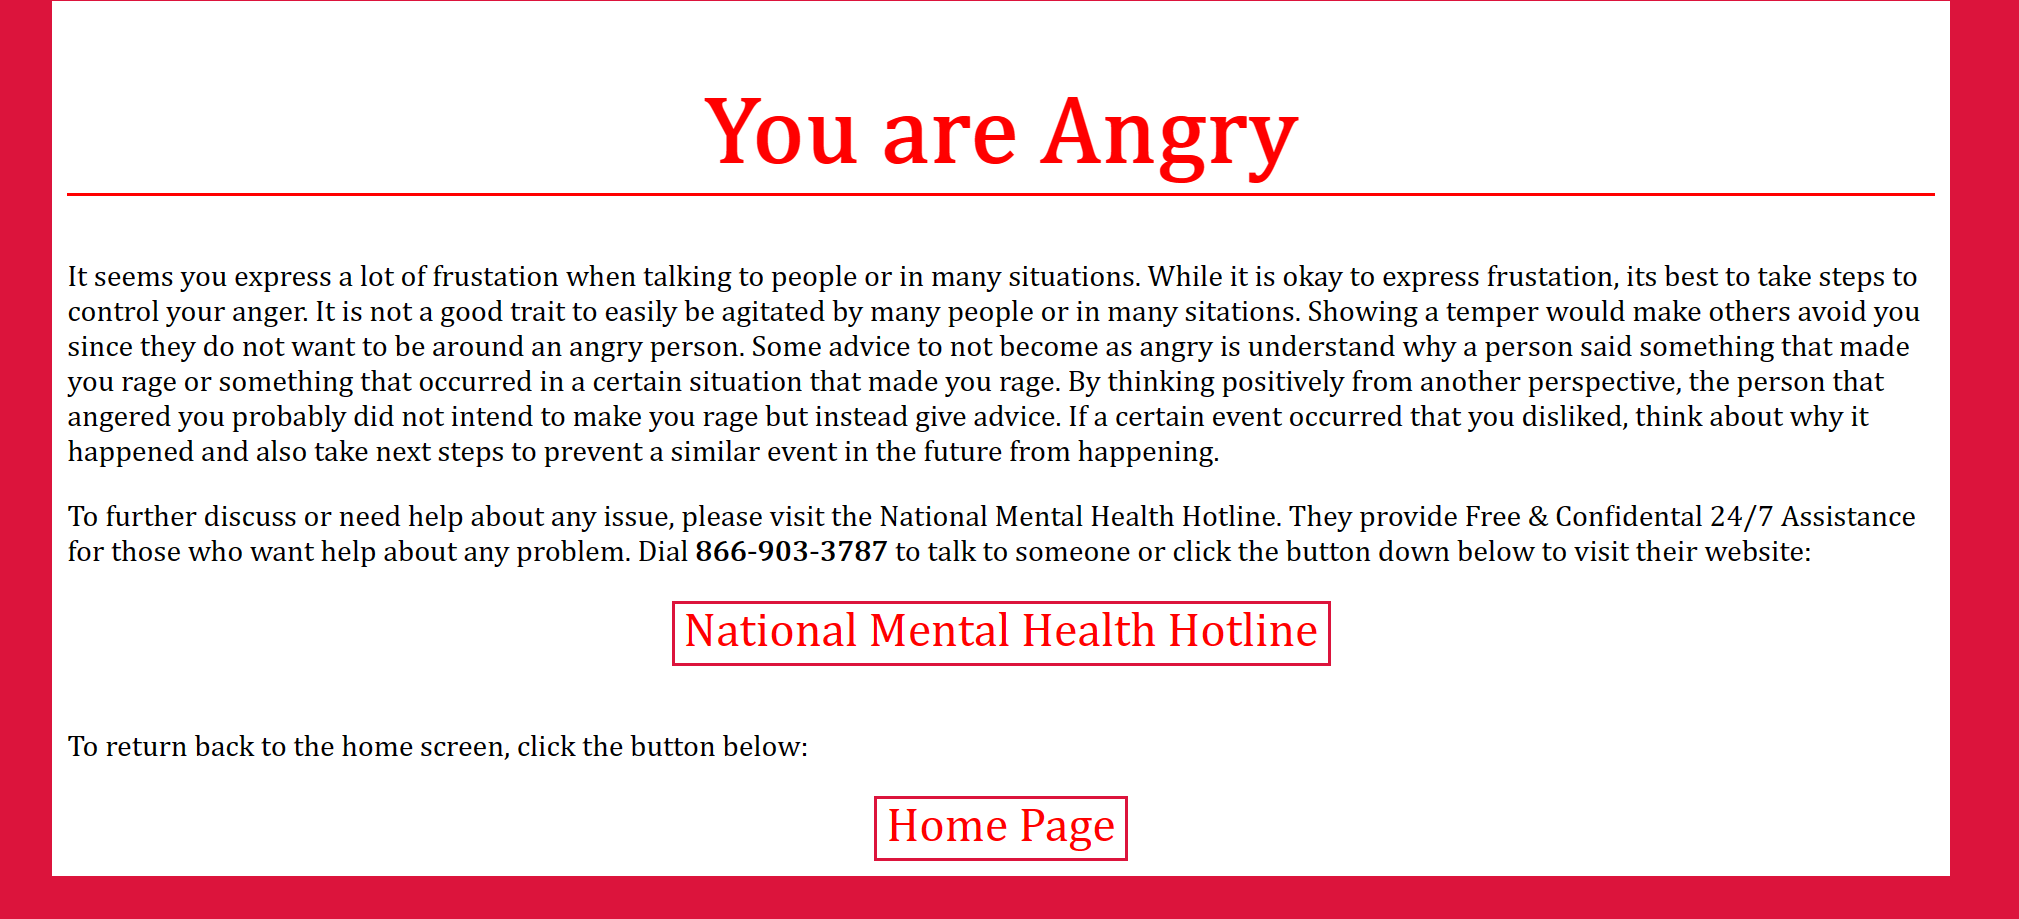
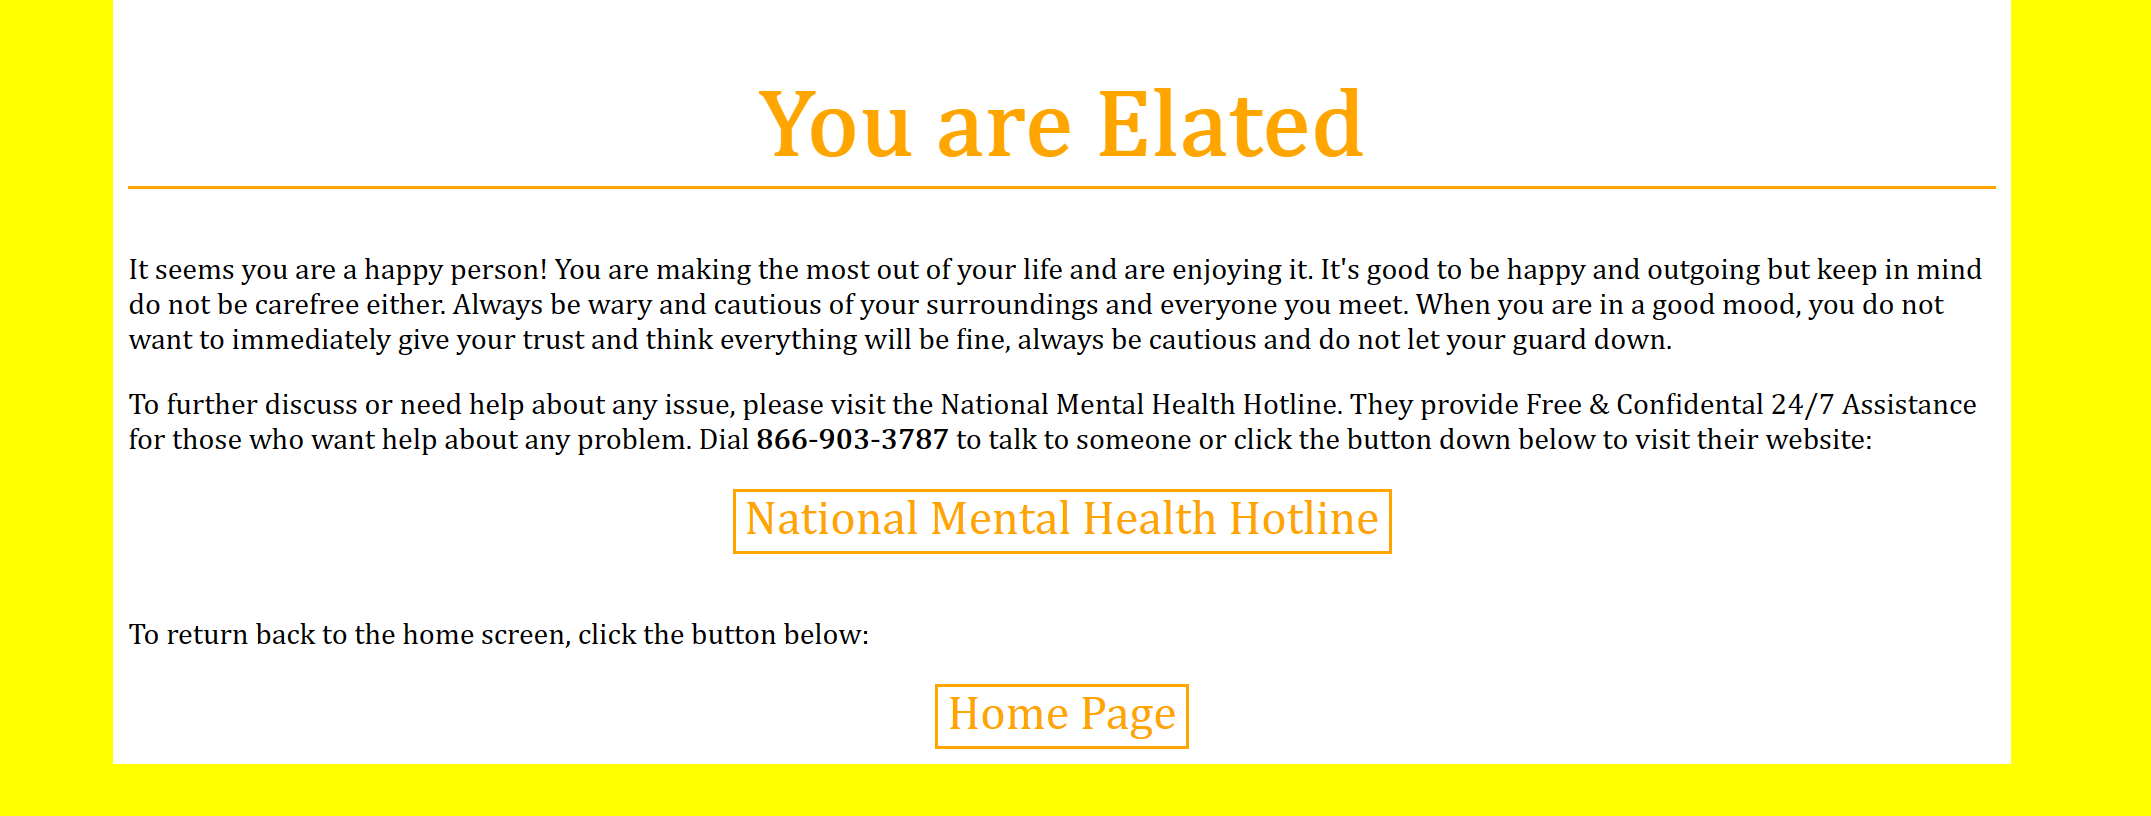
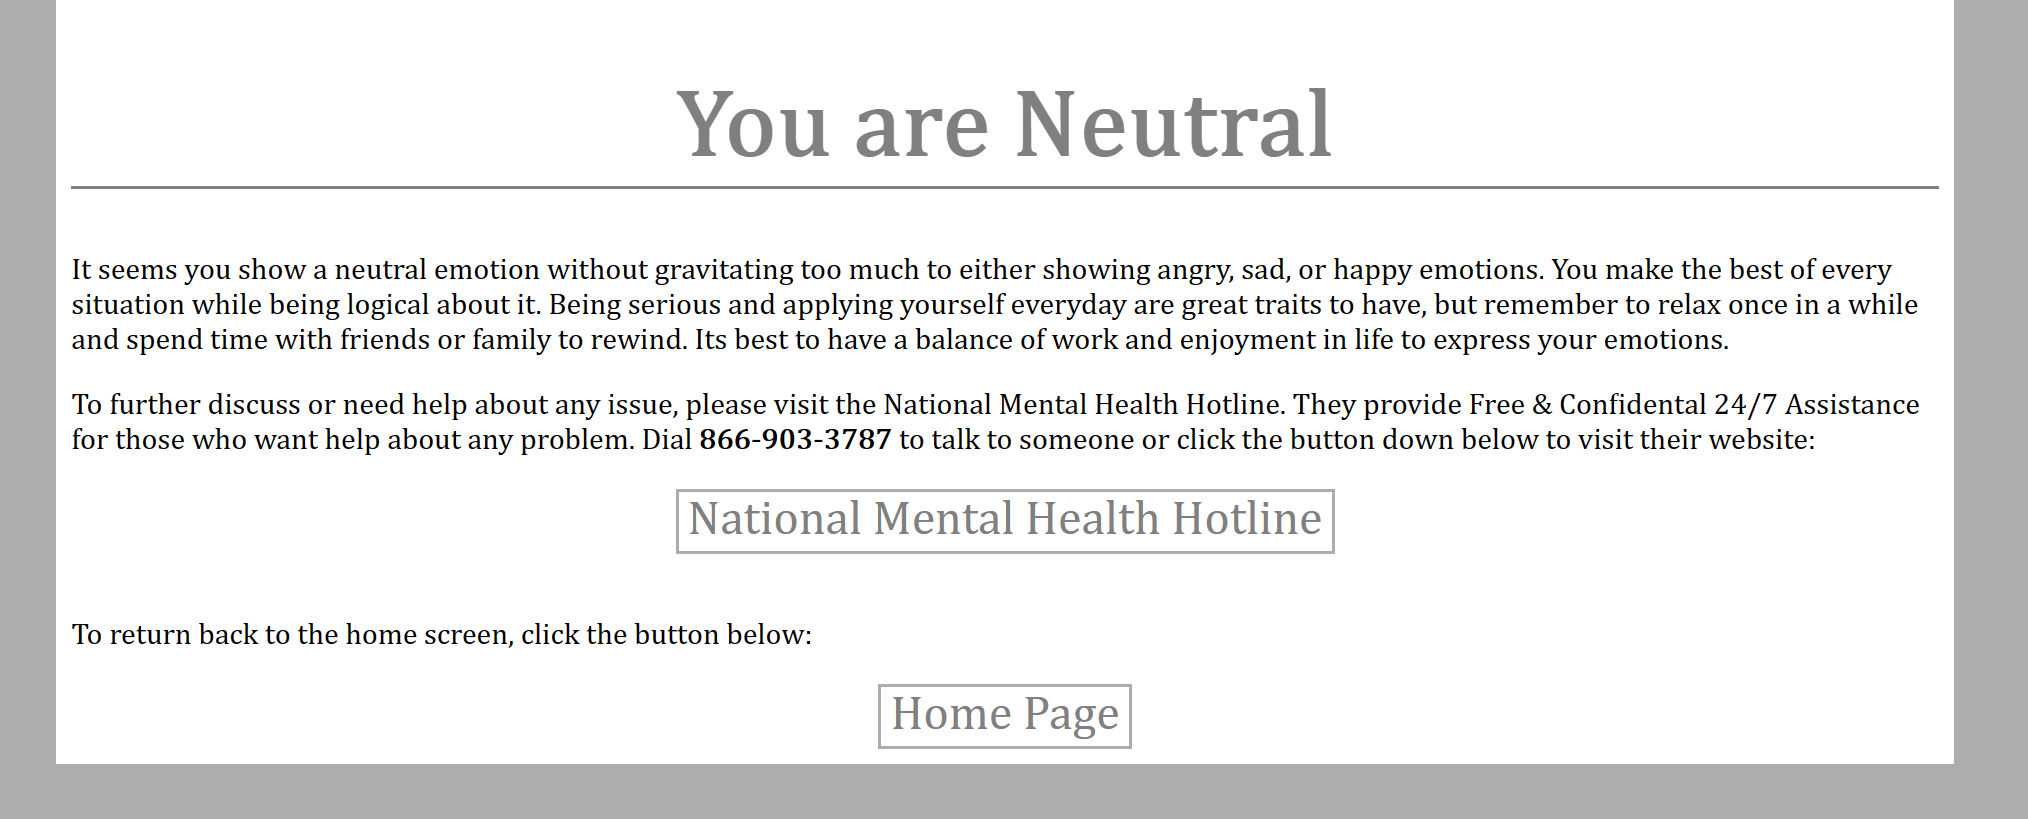
Every emotion page gives recommendations, advice and the National Mental Health Hotline contact information for further help and a button to click to visit their website. After finishing the assessment, there is another button to go back to the Personality Assessment Page.
Try the Application
https://www.andrewdass.com/personality_assessment
Application Source Code
PROJECTS/Project #1: Personality Assessment at main · AndrewDass1/PROJECTS (github.com)
Sources
https://docs.docker.com/develop/develop-images/dockerfile_best-practices/ (1)


