


Overview
This article explains how to send HTML form data to a Python Flask file, which then sends that data to be displayed on another HTML page and also how to create a form in HTML.
Materials
Computer
Notepad or IDE
Python
HTML
Procedure
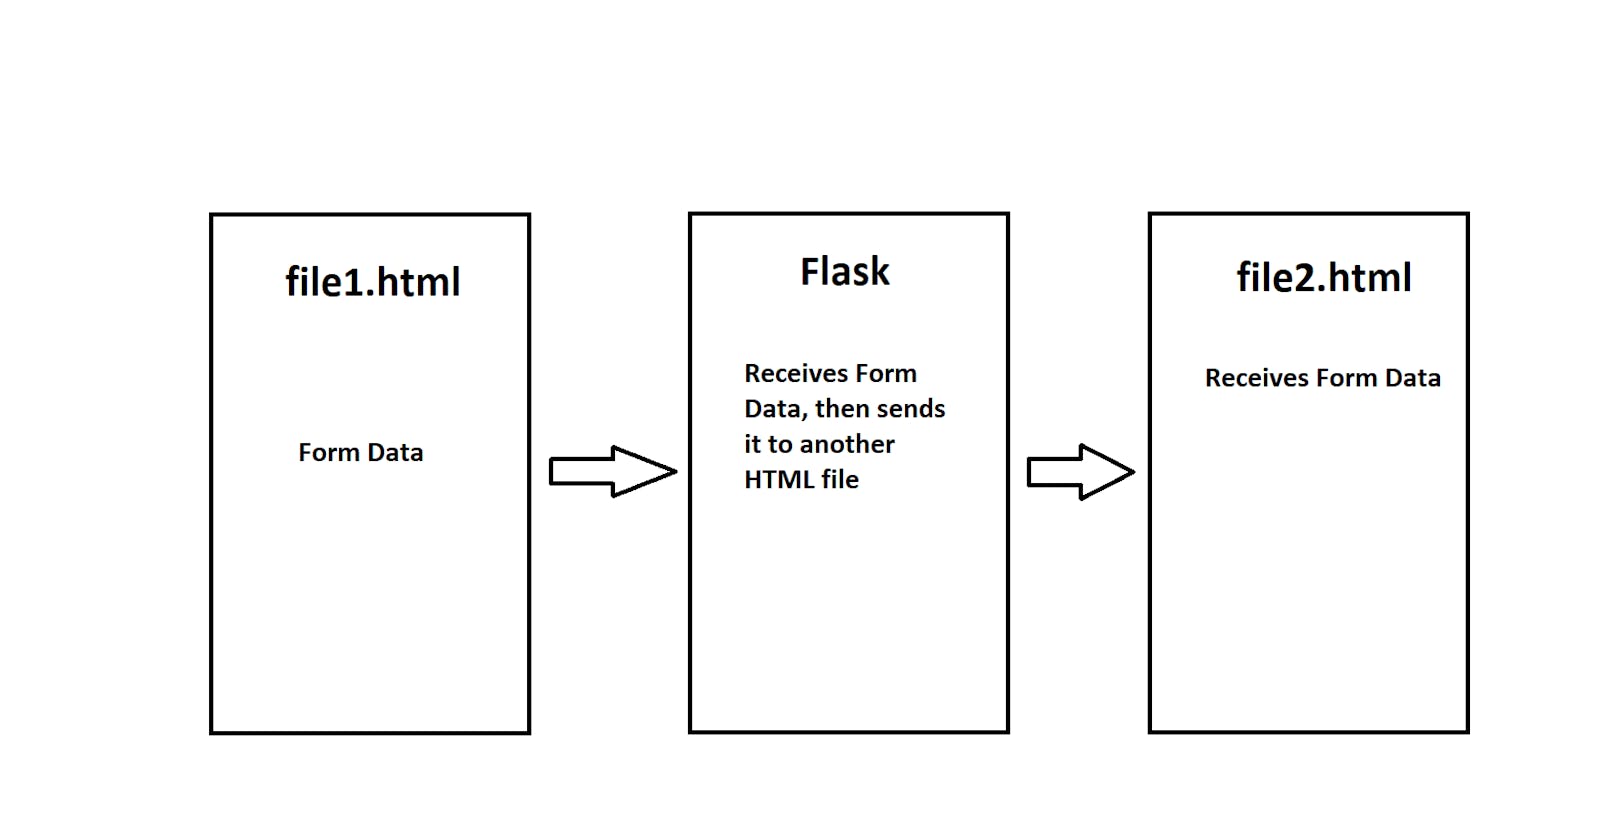
To send data from one HTML file to a Python Flask file and then to another HTML file, two HTML files and one Python file are needed.
Below is the structure of the Flask file:
Flask File
from flask import Flask, render_template, request

app = Flask(__name__)

@app.route("/")
def welcome_page():
    return render_template("file1.html")

@app.route("/file2", methods=['POST'])
def second_page():
    html_data = request.form["enter_value"]
    return render_template("file2.html", html_data=html_data)
# request form from id in html file

if __name__== '__main__':
    app.run(host='0.0.0.0', debug=True, port=5000)
The modules Flask and render_template are needed to run Flask and return HTML pages respectively. In this Flask file, two functions are created to return each HTML page. The second function also includes a variable to use the request module which enables to receive form data from file1.html to send the received data to file2.html.
file1.html
Below is file1.html
<!DOCTYPE html>
<html>
    <head>
    <meta charset="utf-8">
    </head>

    <body>

    <h1> Enter Data</h1>

    <form action="{{url_for('second_page')}}" method="post">
        <label for="enter_value">*Sample Text*:</label><br>
        <input type="text" name="enter_value">
        <input type="submit" value="Submit">
    </form>

    </body>
</html>
file1.html follows a simple HTML structure and implements a form. A form allows inputting data where it can be sent to another file. In this example, a textbox was implemented to write any word that can be sent to file2.html.
Creating a Form
To create a form, use the tags <form>
<form>

</form>
Every form has an action that takes the data where it can then send that data to a desired location. In this case, form action is defined to send it to "second_page", which is the name of the second function defined in Flask. url_for is a technique in Flask to send any data to a location. To also send any data from one location to another, the data must be posted, where method="post" fulfills that.
<form action="{{url_for('second_page')}}" method="post">

</form>
Every form takes at least one defined value by using a <label> tag. The value defined in this case is "enter_value". Forms take different types of data which are specified by "input type". Declaring input type="text" makes this form take a value from a textbox. Any text that is written in the textbox is stored in the enter_value variable since it is declared by including name="enter_value" within the same tag as <input type="text" name="enter_value">. After all the data is filled in the form, the last line is to include another input type="submit" which makes a submit button to send the data over.
<form action="{{url_for('second_page')}}" method="post">
    <label for="enter_value">*Sample Text*:</label><br>
    <input type="text" name="enter_value">
    <input type="submit" value="Submit">
</form>
Below is file1.html with the form.

The name "andrew" is written in the textbox. After clicking submit it is sent to file2.html.

file2.html
Below is file2.html, which includes the word Hello and the variable {{html_data}} to receive the saved variable data from Flask. Double brackets around the variable are necessary to print the variable's stored data that was received from Flask.
<!DOCTYPE html>
<html>
    <head>
        <!-- <meta charset="multipart/form-data"> -->
        <meta charset="utf-8">
    </head>

    <body>
     Hello {{html_data}}
    </body>
</html>
